
lots of people like kitty's product photography, and have asked how she gets such nice shots.
so she's has decided to do a little tutorial about product shots.
(when she says little, wellll, she says little....... O.o )
at any rate.
so she's has decided to do a little tutorial about product shots.
(when she says little, wellll, she says little....... O.o )
at any rate.
:: The Tutorial - part 1 ::
the first thing we want to talk about is cameras.
now, i'm not particularly brand loyal, and really, there are a LOT of functions that most people who are taking mostly product shots just will not need.
the camera functions that you need most, for taking product shots, will be:
a normal mode
a macro mode
and
some way to change the light settings.
as long as your camera has these things, it really doesn't matter what brand it is.
megapixels are important as well, though most cameras now all have at least 6mp, which is perfectly adequate. the difference that most people will notice is that the larger the number of MPs, the larger the picture is. another difference, though, is picture clarity. the more MPs, the more clear the picture is at higher resolutions (and in close ups).
My camera is a FujiFilm FinePix s700. it's got 7MPs and a 10x zoom.
it's also got many different light settings, and 2 levels of macro zooming.
(i'm in love with it, and i named it Belovéd.)
the second thing we want to talk about is your photo-taking setup:
if you don't get good natural light anywhere in your house, you probably need a lightbox.
mine is super cheap and easy.
it is:
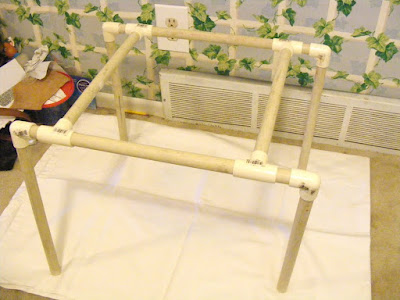
leftover pvc piping
2 white sheets
and that's it.

the pvc is arranged so that there are two c shapes with two crossbars holding them together across the top.
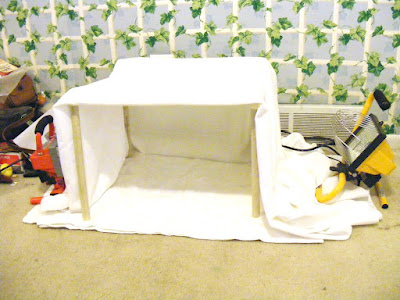
 1 sheet is draped over it, the other under it to act as a white background, and i use two garage work lights to get good strong white light.
the whole thing, set up on the floor, looks like this:
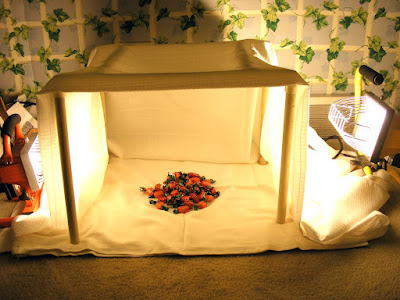
 this is with the garage lights on, and the room lights off:
 you can, of course, put the whole thing on a table for ease-of-use. (we just haven't the room or extra table)
another thing:
a tripod is never a bad thing.
tripods are a wonderful invention, especially for those of us with shakey hands.
good things in a tripod:
an attachment method that works with your camera (most screw-in)
the ability to change the angle of the camera in every direction
adjustable height (though, you don't need a 6' tall camera when all you're taking is 5 pictures of a pair
of earrings.)
mine has a screw-in camera attachment, height-adjustable legs, a knob for changing the angle of the camera, and a handle to change the rotation of the camera. it wasn't as expensive as you might think. i believe mine was about 20.00, and it raises my camera to about 4' when the legs are fully extended. (which helps when i'm taking pictures on a table or counter.)
if a tripod is totally out of the question, do what i did to start:
use a couple books, or a box, and set the camera on that for stability.
it's easy, free, and it really works!
while you're digesting all of that, we'll take a break.
the next part of the tutorial will be posted tomorrow!
now, i'm not particularly brand loyal, and really, there are a LOT of functions that most people who are taking mostly product shots just will not need.
the camera functions that you need most, for taking product shots, will be:
a normal mode
a macro mode
and
some way to change the light settings.
as long as your camera has these things, it really doesn't matter what brand it is.
megapixels are important as well, though most cameras now all have at least 6mp, which is perfectly adequate. the difference that most people will notice is that the larger the number of MPs, the larger the picture is. another difference, though, is picture clarity. the more MPs, the more clear the picture is at higher resolutions (and in close ups).
it's also got many different light settings, and 2 levels of macro zooming.
(i'm in love with it, and i named it Belovéd.)
the second thing we want to talk about is your photo-taking setup:
if you don't get good natural light anywhere in your house, you probably need a lightbox.
mine is super cheap and easy.
it is:
leftover pvc piping
2 white sheets
and that's it.

the pvc is arranged so that there are two c shapes with two crossbars holding them together across the top.
 1 sheet is draped over it, the other under it to act as a white background, and i use two garage work lights to get good strong white light.
the whole thing, set up on the floor, looks like this:
 this is with the garage lights on, and the room lights off:
 you can, of course, put the whole thing on a table for ease-of-use. (we just haven't the room or extra table)
another thing:
a tripod is never a bad thing.
tripods are a wonderful invention, especially for those of us with shakey hands.
good things in a tripod:
an attachment method that works with your camera (most screw-in)
the ability to change the angle of the camera in every direction
adjustable height (though, you don't need a 6' tall camera when all you're taking is 5 pictures of a pair
of earrings.)
mine has a screw-in camera attachment, height-adjustable legs, a knob for changing the angle of the camera, and a handle to change the rotation of the camera. it wasn't as expensive as you might think. i believe mine was about 20.00, and it raises my camera to about 4' when the legs are fully extended. (which helps when i'm taking pictures on a table or counter.)
if a tripod is totally out of the question, do what i did to start:
use a couple books, or a box, and set the camera on that for stability.
it's easy, free, and it really works!
while you're digesting all of that, we'll take a break.
the next part of the tutorial will be posted tomorrow!
I like your light "box". It seems pretty easy to do and I love the way that the light goes through the white fabric.
ReplyDelete