well, actually, you didn't ask, but guess what?
it's a good thing i like photo knitting.
because i've been doing that a lot lately.
here's 3 examples ::
want to see some in progress of that last one?
here's where i started (with the after for perspective) ::
here's after an hour ::
and i really actually LIKE doing this.
would you pay someone to knit a bunch of photos for you?
because i would love to get paid to do this.
~kitty
Showing posts with label photography. Show all posts
whoops! tutorial stahl there.
omg, kitty is a BAD kitty indeed!
she forgot to update with the next part of her tutorial yesterday!
°o°
how rude.
well, i'll just make her do that now, then, shall i?
[part 1] [part 2]
on objects/staging materials:
you don't always need them.
i know that, at least in jewelry, it's nice to photograph necklaces on a bust, earrings on a tree, rings on a stand, etc etc etc, and the temptation is to always do so.
[hint] you don't really need to.
you can give your pictures a signature look even if you don't use any, or if you only use 1 or 2 objects for staging.
personally, i have a white, frosted lucite ring hand and pillar that i like to use for pretty much everything. not only does it give me a set white in each picture (which is great for editing), but it gives all of my photos a cohesive look, and i can use the pieces to block out inconvenient background objects (in case i decide not to use my lightbox).
one downside i've found with jewelry displays is that they can sometimes make it hard for you to get a good focus point on the piece. for instance, using a standard T-display for earrings puts each earring at either end of the picture, instead of in the center where they should be. it causes the focus to be on the display, not the earrings [no good!]. i never really managed to satisfactorily correct this.
i tried everything i could think of to fix it:
photographing on an angle (which did give nice perspectives)
having the T on an angle (which just looked funny, honestly)
just setting the earrings closer together on the T (which was ok, but not quite right)
and many other ridiculous things i just don't remember.
what i found that worked:
just laying them down on colorful paper, or suspending them in front of colorful paper with monofilament.


so if your craft has specialized displays, sure, you can go ahead and get some, especially if you're going to do shows (they're awesome for that), but you don't have to. honestly, i have 8 or 10 different busts, and i only use the lucite ring hand for pictures. the others i save for shows, or use as props in pictures with things that aren't jewelry.
keep in mind that too many objects can distract from the item though:

this is a picture of a plushie i made. he was the media monkey, so i thought i'd photograph him with media devices.
he's kind of crowded out, isn't he? (i still haven't found a picture setup for him that i like enough to list him, so, you can see that it's always a work in progress for product shots)
--what to use as the actual background:
the actual item(s) you use as your background can be anything from a straight piece of corrugated cardboard to colored scrapbooking paper to a piece of fabric.
i've used all three of the above-mentioned items, and i've discovered that i like the scrapbooking paper and fat quarters (quilting fabric, for the uninitiated) the best. between the two of them, i can run the gambit from sexy and sophisticated, to country and kitsch, and everything in between. another thing i like about them is that they're super easy to store and move to wherever i decide to take my pictures that day (i've taken pictures in practically every room in my house. no really. i have.)
what you choose is really up to you, and it may take you a little while to discover what you like the best. if you want some help deciding, try asking a friend or family member. show them a couple different options, and ask which one they like the best and why. (i often do this with my sister. she's been a great help in getting my product shots to the level they are now. as i recall, she was the one who first suggested that i borrow her scrapbooking paper and try that [she's a bookbinder, so she's got lots of colorful papers].)
if you STILL can't decide, or are just getting frustrated, try this:
take 1 picture of 1 piece on each of your choices [as in, the same shot just different backgrounds].
bring them all up side by side by side in your photo-editing software, or even flickr.
stare at them.
stare some more.
if you find your eyes being drawn to one photo over the others go with that style/setup for a while.
if nothing's calling to you, call someone for a second opinion.
if nothing's happening, it's no crime to put it to a vote of strangers on twitter or in a forum.
they'll give an honest opinion, and if you ask for constructive criticisms, they'll help you out.
if you STILL don't have something you're satisfied with, there's no shame in going back to the drawing board. i can't tell you how many item shots i've taken, only to delete them because i just. didn't. like them anymore.
you can even look at what others are doing with their photos and see if any particular part of their setup calls out to you. maybe you like how they use their wooden deck as a backdrop. go ahead and try using a piece of wood or your own deck, and see if it works out for you.
just remember, don't look to copy the setup exactly [that's bad!].
i know there's a lot of people who use paper like i do, i know there's a lot of people who use their deck, it's nothing new.
when i say don't copy exactly, what i mean is this:
try the settING, but use your own setUP.
as in, if the pictures you like use that deck, it's no crime to use yours, but add your own touch. put your item(s) on a piece of glass, or drape it over a prop on that deck of yours. you want your photos to look good, but also to be unique.
--all this being said:
there's nothing wrong with a straight, white background, and no props.
if you can't really afford or find any extras you love, no worries! there's lots that can be done for free, with things you've already got.
do you have white sheets? shirts? jeans? use those as a background! the weave of the cloth will add a nice texture to the photos, and the best part is that it doesn't cost a thing. plus, you can fold, roll, and scrunch that cloth up any which way you want to, so you can fake like you've got some props, when all you've really got is a partially rolled up sheet. plus, sheets and clothes and towels come in lots of colors. i'm fairly certain you've got different colors of sheets, so use them! roll them, scrunch them, layer them, weave them, put them under glass!
also, don't shy away from using whatever table you make your items on as a backdrop! that can work wonderfully (kind of a rustic vibe), and you can use your tools as props.
about 'moody' pix:
setting a mood in a photo can be a difficult thing. for one thing, mood is often set by props, and again, too many of those can drown out the item you're selling.

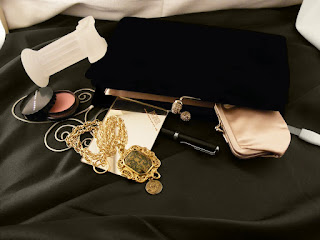
in the series the above picture is from, we were trying to evoke travelling or a train ride.
the 'story' behind the series is that it's a young woman (in the 20s/30s) on a train coming back from touring the world, and she's looking for something in her purse, so she dumps it onto the table in between the seats.
personally, i think the mood is there, and i think that, since the necklaces are gold, and all the paraphenalia is silver, it's not drowned out. i'm sure there are some who are wondering where the necklace is though. it's impossible to please everyone all the time, so just make sure that, while the mood you want is there, the item is still the main focus of the photo.
stay tuned for the next part! it'll be tomorrow, kitty promises (and i'll make her keep it!)
a photography tutorial
lots of people like kitty's product photography, and have asked how she gets such nice shots.
so she's has decided to do a little tutorial about product shots.
(when she says little, wellll, she says little....... O.o )
at any rate.
so she's has decided to do a little tutorial about product shots.
(when she says little, wellll, she says little....... O.o )
at any rate.
:: The Tutorial - part 1 ::
the first thing we want to talk about is cameras.
now, i'm not particularly brand loyal, and really, there are a LOT of functions that most people who are taking mostly product shots just will not need.
the camera functions that you need most, for taking product shots, will be:
a normal mode
a macro mode
and
some way to change the light settings.
as long as your camera has these things, it really doesn't matter what brand it is.
megapixels are important as well, though most cameras now all have at least 6mp, which is perfectly adequate. the difference that most people will notice is that the larger the number of MPs, the larger the picture is. another difference, though, is picture clarity. the more MPs, the more clear the picture is at higher resolutions (and in close ups).
My camera is a FujiFilm FinePix s700. it's got 7MPs and a 10x zoom.
it's also got many different light settings, and 2 levels of macro zooming.
(i'm in love with it, and i named it Belovéd.)
the second thing we want to talk about is your photo-taking setup:
if you don't get good natural light anywhere in your house, you probably need a lightbox.
mine is super cheap and easy.
it is:
leftover pvc piping
2 white sheets
and that's it.

the pvc is arranged so that there are two c shapes with two crossbars holding them together across the top.
1 sheet is draped over it, the other under it to act as a white background, and i use two garage work lights to get good strong white light.
the whole thing, set up on the floor, looks like this:
this is with the garage lights on, and the room lights off:
you can, of course, put the whole thing on a table for ease-of-use. (we just haven't the room or extra table)
another thing:
a tripod is never a bad thing.
tripods are a wonderful invention, especially for those of us with shakey hands.
good things in a tripod:
an attachment method that works with your camera (most screw-in)
the ability to change the angle of the camera in every direction
adjustable height (though, you don't need a 6' tall camera when all you're taking is 5 pictures of a pair
of earrings.)
mine has a screw-in camera attachment, height-adjustable legs, a knob for changing the angle of the camera, and a handle to change the rotation of the camera. it wasn't as expensive as you might think. i believe mine was about 20.00, and it raises my camera to about 4' when the legs are fully extended. (which helps when i'm taking pictures on a table or counter.)
if a tripod is totally out of the question, do what i did to start:
use a couple books, or a box, and set the camera on that for stability.
it's easy, free, and it really works!
while you're digesting all of that, we'll take a break.
the next part of the tutorial will be posted tomorrow!
now, i'm not particularly brand loyal, and really, there are a LOT of functions that most people who are taking mostly product shots just will not need.
the camera functions that you need most, for taking product shots, will be:
a normal mode
a macro mode
and
some way to change the light settings.
as long as your camera has these things, it really doesn't matter what brand it is.
megapixels are important as well, though most cameras now all have at least 6mp, which is perfectly adequate. the difference that most people will notice is that the larger the number of MPs, the larger the picture is. another difference, though, is picture clarity. the more MPs, the more clear the picture is at higher resolutions (and in close ups).
it's also got many different light settings, and 2 levels of macro zooming.
(i'm in love with it, and i named it Belovéd.)
the second thing we want to talk about is your photo-taking setup:
if you don't get good natural light anywhere in your house, you probably need a lightbox.
mine is super cheap and easy.
it is:
leftover pvc piping
2 white sheets
and that's it.

the pvc is arranged so that there are two c shapes with two crossbars holding them together across the top.

the whole thing, set up on the floor, looks like this:


another thing:
a tripod is never a bad thing.
tripods are a wonderful invention, especially for those of us with shakey hands.
good things in a tripod:
an attachment method that works with your camera (most screw-in)
the ability to change the angle of the camera in every direction
adjustable height (though, you don't need a 6' tall camera when all you're taking is 5 pictures of a pair
of earrings.)
mine has a screw-in camera attachment, height-adjustable legs, a knob for changing the angle of the camera, and a handle to change the rotation of the camera. it wasn't as expensive as you might think. i believe mine was about 20.00, and it raises my camera to about 4' when the legs are fully extended. (which helps when i'm taking pictures on a table or counter.)
if a tripod is totally out of the question, do what i did to start:
use a couple books, or a box, and set the camera on that for stability.
it's easy, free, and it really works!
while you're digesting all of that, we'll take a break.
the next part of the tutorial will be posted tomorrow!
a kitty how-to
kitty thought that you might want to know how one of her friends (read: alter egos) makes their photos so silly and neat.
they use a green screen photography technique~
the photos are taken on a bright green background (but any color that's bright, super saturated, and not in the item you're photographing will do fine.), and then edit in photoshop to take out the green and replace it with something else.
below is a little picture tutorial that kitty made up with a pretty purple jellyfish that her friend made for a lovely chocolate astronaut. click on it for a bigger version!

a new project idea
whilst rummaging around in the detritus of the house (as cats are wont to do), kitty discovered this:

being the creative girl she is, kitty thought it might be neat to take a series of photographs using this.
maybe a series of every day tasks (like, for instance, making breakfast), but with each of the 5 filters used.
the filters it has:
normal vision - healthy eyesight

macular degeneration - loss of central vision, causing a blank spot in the center of vision

diabetic retinopathy - new blood vessels grow along the retina, causing vision to seem blurred by white flakes

glaucoma - fluid pressure increases within the eye, causing a kind of tunnel vision

and
cataracts - clouding of the eye lens, causing a milky film to cover vision.

the reason being, kitty has always been vaguely obsessed with how people see, and eyes in general, and often wonders how people see when there is something wrong with their eyes.
kitty herself is nearsighted, and wears glasses to drive and see farther than the other end of the dining table clearly. it took her until sophomore year of high school to realise that there was something wrong with her eyes. she thought everyone saw the way she does. it simply never occurred to her that the board was not blurry for everyone. (no really, it never occurred. kitty can be kind of selectively stupid like that sometimes.)
so, here's the question:
good idea? back to the scratching post?
any questions?
photo safari!
kitty went on a photo safari today!
she took about 100 photos and videos total.
a lot of them are for different series' that she's planning, but a few were just random "oo, pretty!" shots.
some of them are below (i just put links because there's a lot of them.) :
[link]
[link]
[link]
[link]
[link]
so, kitty'll be having new postcards in her shop soon!
sets of them!
(p.s., kitty hassa sunburn too, even though she was wearing sunscreen. it HURTS!)
tags:
owie,
photography,
photosafari,
sunburned
The First Melon of Critique
well, ok, so it's a photo and not a melon, but we don't care.
ok, so:
a little info about the picture:
it was taken a little before sundown on a summer day
it's a big old tree the borders a local school
a little about what's been done to it:
slight color correction
increased vibrancy
increased saturation levels
--nya~!

a little info about the picture:
it was taken a little before sundown on a summer day
it's a big old tree the borders a local school
a little about what's been done to it:
slight color correction
increased vibrancy
increased saturation levels
so, please tell kitty:
do you like it?
why?
OR
do you not like it?
why not?
OR
what you think it needs?
why?
do you like it?
why?
OR
do you not like it?
why not?
OR
what you think it needs?
why?
--nya~!
Subscribe to:
Posts (Atom)