so we all knew that wasn't gonna last, didn't we?

i hope so. that's a yobokitteh fail there.

and so: on to the rest of the tutorial!
[part 1] [part 2] [part3]


finally~! on to the ACTUAL photographing!
right?

let's go over our list, and make sure we're ready to start our trials.

camera?
-with normal, macro, and light settings?
tripod?
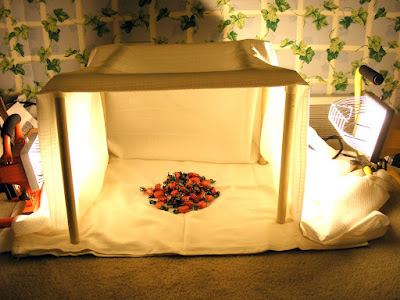
lightbox, or daylight with a sheet over the window?
background?
props (if any)?
ITEM(S)?

got all those?
ok, then, time to set up the space!

what you want in an ideal photo-taking space is:

if you want natural light:
windows! at least 1, and actually, facing north with little or no shade hitting it would be best (i'll tell you why in a second.).
a flat, CLEAN place to put your setup and item. a cluttered, uneven table does not a photo-station make.
room to stand behind your camera and not cast overt shadows.

if you have a lightbox:
a flat, clean space to set up. again, cluttered, uneven tabulature =/= photostation.
room to stand behind the camera w/o overt shadowings.

here's why the north-facing window:
the sun rises in the east, sets in the west. if the window faces north, it will get wonderful light, but not direct light. to take product shots, you want diffuse light, which means you don't want direct sunlight. even with the north-facing window, you may still need to diffuse the light further with a thin white sheet. sheer drapery will work as well, if you have sheers hanging anyway. to figure out if you need to hang that sheet, set yourself up under the window, and take a couple test shots. if they're too bright, hang the sheet.

for people taking pix in natural light, you'll want a table under said N/F window. for those of us with lightboxes, a clear space on the floor will work well. it's what i use, and haven't had issue yet (except with my kittens wanting in on the photography-actions).

about the shadow-castings:
photographer-shadow is a sad, sad thing, and sometimes, it is unavoidable.
however! there are many many MANY ways to minimize them.

f'r'instance:
turn off the lights in the room, except those you're using with the lightbox.
close the drapes on the other windows.

if you're still casting overt shadows, see if your camera has a timer.
if it does, set up the camera on the tripod, turn on the timer, and focus the shot.
press the shutter button, and back up 3 steps.

backing up means that you won't cast a shadow, and the timer will take the focused photo you set.

hawt, ne?

if you're CAMERA is still casting shadows that you don't like:
set the camera a little farther away, and if you need to, extend the legs of the tripod a little.
if you can't really move the tripod, position the piece a little farther away from the camera.
don't forget that you can always zoom in. ^.^

SO
FINALLY

you have everything set up!
you have everything ready!

you snap a few pictures, and when you get them onto the computer: they're blurry, or too dark, or they're yellow or blue or green or chartreuse!

this is where having patience and alterable light settings on the camera will help you.

for blurry:
tripods are your friend!
if you were USING one, try setting the timer, that way, you aren't touching the camera when the shutter closes.
also, check the focus, and make sure it's not asking you for the macro mode. sometimes, if don't use the macro when you need it, the camera will focus on something farther away.

for too dark:
if you've got that sheet over the window, move it down a little, to let some light in above it.
if you're using a light box, you need stronger lights, or a thinner top sheet. try the thinner sheet first, it's cheaper!

for the oddly-colored:
this is where the trial and error method really will save you.
you're ideally wanting to do as LITTLE post-processing as physically possible. as in, you want to crop/resize and move on.
so, try out those different light settings.

my camera has:
auto, custom, fine, shade, 3 flourescents, and an incandescent.

my absolute favourite one is the custom setting, and here's why:
you point the camera at your object, with the whole setup in place of course, and take a 'picture' of it. the camera then analyzes the picture, and comes up with a light profile based on that picture, and until you reset it, will use that profile on all the subsequent pictures.
my fuji is usually right on with the colors, though sometimes a little dark. i'd rather have a slightly darker photo than i wanted than one that's got an orange or yellow or green caste.

for 1 thing, dark is a helluvalot easier to fix than chartreuse!

aaaaaaaaaaaaaaaaand that's all kitteh has written for a tutorial.
if you have questions, please ask them! also, if there's something she didn't cover, tell us! :D

whoops! tutorial stahl there.

omg, kitty is a BAD kitty indeed!
she forgot to update with the next part of her tutorial yesterday!
°o°
how rude.

well, i'll just make her do that now, then, shall i?

[part 1] [part 2]

on objects/staging materials:

you don't always need them.

i know that, at least in jewelry, it's nice to photograph necklaces on a bust, earrings on a tree, rings on a stand, etc etc etc, and the temptation is to always do so.

[hint] you don't really need to.

you can give your pictures a signature look even if you don't use any, or if you only use 1 or 2 objects for staging.

personally, i have a white, frosted lucite ring hand and pillar that i like to use for pretty much everything. not only does it give me a set white in each picture (which is great for editing), but it gives all of my photos a cohesive look, and i can use the pieces to block out inconvenient background objects (in case i decide not to use my lightbox).


one downside i've found with jewelry displays is that they can sometimes make it hard for you to get a good focus point on the piece. for instance, using a standard T-display for earrings puts each earring at either end of the picture, instead of in the center where they should be. it causes the focus to be on the display, not the earrings [no good!]. i never really managed to satisfactorily correct this.

i tried everything i could think of to fix it:
photographing on an angle (which did give nice perspectives)
having the T on an angle (which just looked funny, honestly)
just setting the earrings closer together on the T (which was ok, but not quite right)
and many other ridiculous things i just don't remember.

what i found that worked:
just laying them down on colorful paper, or suspending them in front of colorful paper with monofilament.


so if your craft has specialized displays, sure, you can go ahead and get some, especially if you're going to do shows (they're awesome for that), but you don't have to. honestly, i have 8 or 10 different busts, and i only use the lucite ring hand for pictures. the others i save for shows, or use as props in pictures with things that aren't jewelry.

keep in mind that too many objects can distract from the item though:


this is a picture of a plushie i made. he was the media monkey, so i thought i'd photograph him with media devices.
he's kind of crowded out, isn't he? (i still haven't found a picture setup for him that i like enough to list him, so, you can see that it's always a work in progress for product shots)

--what to use as the actual background:

the actual item(s) you use as your background can be anything from a straight piece of corrugated cardboard to colored scrapbooking paper to a piece of fabric.

i've used all three of the above-mentioned items, and i've discovered that i like the scrapbooking paper and fat quarters (quilting fabric, for the uninitiated) the best. between the two of them, i can run the gambit from sexy and sophisticated, to country and kitsch, and everything in between. another thing i like about them is that they're super easy to store and move to wherever i decide to take my pictures that day (i've taken pictures in practically every room in my house. no really. i have.)

what you choose is really up to you, and it may take you a little while to discover what you like the best. if you want some help deciding, try asking a friend or family member. show them a couple different options, and ask which one they like the best and why. (i often do this with my sister. she's been a great help in getting my product shots to the level they are now. as i recall, she was the one who first suggested that i borrow her scrapbooking paper and try that [she's a bookbinder, so she's got lots of colorful papers].)

if you STILL can't decide, or are just getting frustrated, try this:
take 1 picture of 1 piece on each of your choices [as in, the same shot just different backgrounds].
bring them all up side by side by side in your photo-editing software, or even flickr.

stare at them.

stare some more.

if you find your eyes being drawn to one photo over the others go with that style/setup for a while.
if nothing's calling to you, call someone for a second opinion.

if nothing's happening, it's no crime to put it to a vote of strangers on twitter or in a forum.
they'll give an honest opinion, and if you ask for constructive criticisms, they'll help you out.

if you STILL don't have something you're satisfied with, there's no shame in going back to the drawing board. i can't tell you how many item shots i've taken, only to delete them because i just. didn't. like them anymore.

you can even look at what others are doing with their photos and see if any particular part of their setup calls out to you. maybe you like how they use their wooden deck as a backdrop. go ahead and try using a piece of wood or your own deck, and see if it works out for you.
just remember, don't look to copy the setup exactly [that's bad!].

i know there's a lot of people who use paper like i do, i know there's a lot of people who use their deck, it's nothing new.

when i say don't copy exactly, what i mean is this:

try the settING, but use your own setUP.

as in, if the pictures you like use that deck, it's no crime to use yours, but add your own touch. put your item(s) on a piece of glass, or drape it over a prop on that deck of yours. you want your photos to look good, but also to be unique.

--all this being said:

there's nothing wrong with a straight, white background, and no props.
if you can't really afford or find any extras you love, no worries! there's lots that can be done for free, with things you've already got.

do you have white sheets? shirts? jeans? use those as a background! the weave of the cloth will add a nice texture to the photos, and the best part is that it doesn't cost a thing. plus, you can fold, roll, and scrunch that cloth up any which way you want to, so you can fake like you've got some props, when all you've really got is a partially rolled up sheet. plus, sheets and clothes and towels come in lots of colors. i'm fairly certain you've got different colors of sheets, so use them! roll them, scrunch them, layer them, weave them, put them under glass!

also, don't shy away from using whatever table you make your items on as a backdrop! that can work wonderfully (kind of a rustic vibe), and you can use your tools as props.

about 'moody' pix:

setting a mood in a photo can be a difficult thing. for one thing, mood is often set by props, and again, too many of those can drown out the item you're selling.


in the series the above picture is from, we were trying to evoke travelling or a train ride.
the 'story' behind the series is that it's a young woman (in the 20s/30s) on a train coming back from touring the world, and she's looking for something in her purse, so she dumps it onto the table in between the seats.

personally, i think the mood is there, and i think that, since the necklaces are gold, and all the paraphenalia is silver, it's not drowned out. i'm sure there are some who are wondering where the necklace is though. it's impossible to please everyone all the time, so just make sure that, while the mood you want is there, the item is still the main focus of the photo.

stay tuned for the next part! it'll be tomorrow, kitty promises (and i'll make her keep it!)

tutorial part II

:: The Tutorial - part 2 ::

the third thing to talk about is backgrounds:

my primany experience is with jewelry, so most of this will be in relation to jewelry, and small plushies.

the things i've noticed that work best are these:

no matter the texture of the item, if the background is a complimentary color, it stands out.
blue on yellow, red on black, green on purple, teal on orange, etc.
if a color decision is not forthcoming, a pale ivory or a black and white print are great defaults.


if you're having trouble deciding on what the dominant color in your item is (so that you can decide on a background), lay it over/next to a color wheel. [link to color wheel]

whichever color you now see the most of is what you should think of as the dominant color. the nice thing about using a color wheel is that you just need to pick the color opposite your dominant to find the color that will make it stand out. (you can even use the color wheel to take pictures on, if you like.) (^.-)-b

second thing about backgrounds:
texture isn't bad! especially if your item is very smooth (like beads or wire).
the right texture can actually enhance your item. if you have a rough item, like a plushie, try a smooth background. the dichotomy of textures will actually enhance your items texture.


keep in mind though, that if your item is metallic, you don't necessarily want a metallic background. that being said, a piece of black velvet with a nice, clean piece of glass over top can compliment a piece very well. just be sure to avoid glares! if you're using natural light, put a thin white sheet over the window. it'll diffuse the light enough that you won't have bad glare, but still let in enough light to take decent photos. it's the same idea with the lightbox, actually. the top white sheet diffuses the light without discoloring it.

another thing you'll want to keep in mind is this:
dark item, light background
light item, dark background

the darker your item, the lighter you want the background (whatever you choose to use).
if you photograph a light item on white, there's the risk that the item will fade into the background. the easiest way to avoid this is to choose a darker, complimentary shade for the background. the same idea is true for darker items. if you have a dark item, and you photograph it on something black or dark brown, the item may end up blending in (and that's not what we want), so choose a lighter, complimentary color for the background.

if your item covers a range of darks and lights, consider using a simple gradient printed off the computer. [here's a tutorial to make one yourself in photoshop: http://beadabundant.blogspot.com/2009/07/tutorial-gradient-background-for-bead.html ]

i know keeping all that in mind can seem dizzying, but once you've gotten it, it'll become second nature for you when photographing your items.

stay tuned for part 3 tomorrow!
**photos compliments of theplushiefoundry.com and jewelry-ninja.com

a photography tutorial

lots of people like kitty's product photography, and have asked how she gets such nice shots.
so she's has decided to do a little tutorial about product shots.
(when she says little, wellll, she says little....... O.o )
at any rate.

:: The Tutorial - part 1 ::

the first thing we want to talk about is cameras.
now, i'm not particularly brand loyal, and really, there are a LOT of functions that most people who are taking mostly product shots just will not need.

the camera functions that you need most, for taking product shots, will be:
a normal mode
a macro mode
and
some way to change the light settings.

as long as your camera has these things, it really doesn't matter what brand it is.

megapixels are important as well, though most cameras now all have at least 6mp, which is perfectly adequate. the difference that most people will notice is that the larger the number of MPs, the larger the picture is. another difference, though, is picture clarity. the more MPs, the more clear the picture is at higher resolutions (and in close ups).

My camera is a FujiFilm FinePix s700. it's got 7MPs and a 10x zoom.
it's also got many different light settings, and 2 levels of macro zooming.
(i'm in love with it, and i named it Belovéd.)

the second thing we want to talk about is your photo-taking setup:

if you don't get good natural light anywhere in your house, you probably need a lightbox.
mine is super cheap and easy.

it is:
leftover pvc piping
2 white sheets

and that's it.


the pvc is arranged so that there are two c shapes with two crossbars holding them together across the top.

1 sheet is draped over it, the other under it to act as a white background, and i use two garage work lights to get good strong white light.

the whole thing, set up on the floor, looks like this:

this is with the garage lights on, and the room lights off:

you can, of course, put the whole thing on a table for ease-of-use. (we just haven't the room or extra table)

another thing:

a tripod is never a bad thing.
tripods are a wonderful invention, especially for those of us with shakey hands.

good things in a tripod:
an attachment method that works with your camera (most screw-in)
the ability to change the angle of the camera in every direction
adjustable height (though, you don't need a 6' tall camera when all you're taking is 5 pictures of a pair
of earrings.
)

mine has a screw-in camera attachment, height-adjustable legs, a knob for changing the angle of the camera, and a handle to change the rotation of the camera. it wasn't as expensive as you might think. i believe mine was about 20.00, and it raises my camera to about 4' when the legs are fully extended. (which helps when i'm taking pictures on a table or counter.)

if a tripod is totally out of the question, do what i did to start:
use a couple books, or a box, and set the camera on that for stability.

it's easy, free, and it really works!

while you're digesting all of that, we'll take a break.
the next part of the tutorial will be posted tomorrow!

Places you will soon see kitty

well, ok, so it's only 1 place, but!

kitty has a consignment deal!

*happy dance*

so, if you're in Columbus, Ohio, and anywhere near Kenny and Bethel:
stop into the WoodCraft Center (little strip mall) and:

go to Mystic Nirvana

the whole front of the store is filled with original artwork!

plus, there's a big pinecone hanging from the ceiling, and really, can you GO wrong with that?
i don't think so.

of updates and castles in the sky

of updates:
so, i've started updating the shop more often! :D
still haven't gotten ALL of the 'Playground' series uploaded yet, but i'm workin' on it!
(yobo's having some delays in the form of problems with financial aid [again! >.<]. eventually, yobo will end up killing someone.)

of Castles in the Sky:
kitty's friend Cyndi is opening her etsy shop on Halloween! (also kitty's birthday [yobo's too!] ! )
her shop is called Castle in the Sky and she makes RenFaire garb for kids!
it's all super affordable too.
she'll be specializing in kid's stuff that will grow with them, and she'll be doing made-to-order adult stuff as well.

(kitty would especially like to call attention to miss SkyCastle's graphics, which she made [she's very proud of them, and thinks they're pretty cool.].)

now, kitty and i happen to know that miss Cyndi will most likely be having freeshippings in her shop, but since she's opening on the 31st, there's sure to be LOTS going on elsewhere on etsy (hint hint; kitty's having a hobbit birthday present [so is yobo!] !).

so, overview!

Castle in the Sky:
new etsy store belonging to miss kitty's friend Cyndi
opening Halloween! (oct. 31st y'all)
kids' RenFaire garb
-grows with them
adult garb made to order
free shippings (and i think 10% off as well)

so make sure you'll be there! :D [link]
there's a fanpage : [link]

yaaaaaaaaaaaay!
--kitty and yobo

edit;
ok, so it turns out that miss Cyndi didn't manage to open on halloween. she was just too swamped with her own little ones and trick or treating! they got lots of yummie candy though, so it's ok. :D
she'll open soon, and i'll let you know! :D

what's this? a post from kitty?

omg!

ok, well, you know how, in that last post, kitty said she was going to be posting those prints soon?

weeeeeeeeeerllllllllllllll, uhm, we had some school-finance-troubles and got way too frustrated to bother with it for a while.

so, the 'This used to be my playground' series is going up now.
in fact: the 1st 4! all 3.5x5" prints.

http://tinyurl.com/yflkrsg
http://tinyurl.com/yzj3xxn
http://tinyurl.com/yj475yr
http://tinyurl.com/yjjxt9j

in the next few days we'll (hopefully!) get the 5x7s and 8x10s up, but since kitty's going to school 5 days a week, this might get pushed to the back burners. (she's trying to be a good girl in school this time, and actually DO her homeworks [novel idea, ne?].)

in other news, kitty's helper-human yobo finally got her website going, so if you want to see it, follow this [link]. it's full of pretty shiny things that she keeps telling me aren't toys...... (i don't really believe her. i mean, how can they NOT be toys!? they're so shiiiiiinnyyyyyyy! >:3 )

3 ½, 5, & 8

This used to be my playground.....
This used to be my childhood dream, the place I ran to, when I needed a friend.
Why did it have to end? and why do they always say, 'Dont look back', 'Keep your head held high', 'dont ask them why', 'Life is short',? Before you know it, you're feeling old, and your heart is breaking. 'Dont hold on to the past'. Well, that's too much to ask.

Live and learn, well the years they flew, and we never knew. We were foolish then. We'd never tire. That little fire is still alive in me. It'll never go away, I can't say goodbye to yesterday.
No regrets, but I wish that you were here with me.
Well then, there's hope yet.
I can see your face, in our secret place. You're not just a memory. 'Say goodbye to yesterday', those are words I'll never say....

This used to be our playground....
This used to be our childhood dream, our greatest escape....
This used to be the place we ran to, our secret hiding place....

Wishing you were here with me....

[these prints are soon to be in the etsy shop {top picture is 3.5x3.5 prints on 3.5x5" glossy} {middle picture is 5x5 prints on 5x7" glossy}, {bottom picture is 8x8 prints on 8.5x11" glossy}.]

What's on the Other Side.....?

Why are there so many songs about rainbows, and what's on the other side?
Rainbows are visions, they're only illusions, and rainbows have nothing to hide.

So we've been told, and some chose to believe it. But I know they're wrong, wait and see.

Someday we'll find it, the rainbow connection, the lovers, the dreamers, and me.

Who said that every wish would be heard and answered, when wished on the morning star?
Somebody thought of that, and someone believed it, and look what it's done so far.

What's so amazing, that keeps us star gazing, so we think we might see.
Someday we'll find it that rainbow connection, the lovers, the dreamers and me.

Have you been half asleep, and have you heard voices?
I've heard them calling my name.

Are these the sweet sounds that called the young sailors?
I think they're one and the same.

I've heard it too many times to ignore it.
There's something that I'm supposed to be.

Someday we'll find it, the rainbow connection.
The lovers, the dreamers and me.......

all are available in my etsy store:

~Kitty

a kitty how-to

kitty thought that you might want to know how one of her friends (read: alter egos) makes their photos so silly and neat.

they use a green screen photography technique~
the photos are taken on a bright green background (but any color that's bright, super saturated, and not in the item you're photographing will do fine.), and then edit in photoshop to take out the green and replace it with something else.
below is a little picture tutorial that kitty made up with a pretty purple jellyfish that her friend made for a lovely chocolate astronaut. click on it for a bigger version!

here's the finished product: [link]

a new project idea

whilst rummaging around in the detritus of the house (as cats are wont to do), kitty discovered this:
it's a "Vision Simulator Card" from the Ohio Optemetric Association.
being the creative girl she is, kitty thought it might be neat to take a series of photographs using this.

maybe a series of every day tasks (like, for instance, making breakfast), but with each of the 5 filters used.

the filters it has:
normal vision - healthy eyesight

macular degeneration - loss of central vision, causing a blank spot in the center of vision

diabetic retinopathy - new blood vessels grow along the retina, causing vision to seem blurred by white flakes

glaucoma - fluid pressure increases within the eye, causing a kind of tunnel vision

and

cataracts - clouding of the eye lens, causing a milky film to cover vision.

the reason being, kitty has always been vaguely obsessed with how people see, and eyes in general, and often wonders how people see when there is something wrong with their eyes.

kitty herself is nearsighted, and wears glasses to drive and see farther than the other end of the dining table clearly. it took her until sophomore year of high school to realise that there was something wrong with her eyes. she thought everyone saw the way she does. it simply never occurred to her that the board was not blurry for everyone. (no really, it never occurred. kitty can be kind of selectively stupid like that sometimes.)

so, here's the question:
good idea? back to the scratching post?
any questions?

photo safari!

kitty went on a photo safari today!

she took about 100 photos and videos total.

a lot of them are for different series' that she's planning, but a few were just random "oo, pretty!" shots.

some of them are below (i just put links because there's a lot of them.) :
[link]

[link]

[link]

[link]

[link]

so, kitty'll be having new postcards in her shop soon!
sets of them!

(p.s., kitty hassa sunburn too, even though she was wearing sunscreen. it HURTS!)

The First Melon of Critique

well, ok, so it's a photo and not a melon, but we don't care.

ok, so:

a little info about the picture:
it was taken a little before sundown on a summer day
it's a big old tree the borders a local school

a little about what's been done to it:
slight color correction
increased vibrancy
increased saturation levels

so, please tell kitty:
do you like it?
why?
OR
do you not like it?
why not?
OR
what you think it needs?
why?

--nya~!

Blog for Kitty!

heyheyhey!
Kitty's finally gotten her act together (with the help of her sister, notubóc!), and gotten her blog up and going!

this is where she's going to post photos that she's taken (but doesn't want to sell), digital stuff that she's made, and things that she'd like crititques or comments on.

in this, kitty's official post, she wanted to be sure to say this:

meow

....
....

yes, we think that about covers it.

stay tuned for posties!
(they're like pasties, but less sticky, and don't cover up nipples.)

--Kitty